Showing posts with label Peruvian. Show all posts

Friday, September 2, 2011

Arroz Chaufa (Fried Rice)

When you think of fried rice, you usually think of a side dish to some Asian saucy meat, or just something thrown in for the purpose of soaking up the sauce. But in my house, fried rice is the main dish, a complete meal on its own.
And when you see what all goes into making it, I think you’ll agree. It truly is a complete meal. It has fiber (rice), meats (ham, chicken, bacon), vegetables (green onion, mushroom) and egg.
Don’t be afraid to go crazy with your veggies either, this is the perfect dish for doing so. I also like to use julienned carrot, sweet peas, bean sprouts, snow peas, whole kernel corn, broccoli, and celery. This is a good way to use veggies that might go bad.
I didn’t use garlic in this particular recipe (amazing if you’ve read any of my other recipes) and although I missed it, I think it held its own with just the ginger. The nice thing about fried rice is that you can make it a dozen different ways and never get tired of it.
I’m not sure, but I think the term chaufa originated in Peru. It means Asian style food. Paired with the Spanish word for rice — arroz — the dish gets its name.
This recipe is a lot simpler to make if you own a wok. Without it, you’ll probably use several pans.

Ingredients:
4 cups cooked white rice
3 eggs, scrambled
1 cup chopped ham
1 cup chopped green onions
1/2 to 1 cup shredded chicken
1 1/2 cups mushrooms, chopped
4 tbs thinly sliced and chopped ginger
1 tsp salt
1 cup cooked and shredded chicken breasts
4 large slices fried and crumbled bacon
3 tbs soy sauce

Preparation:
Cook the bacon to you liking, then put on paper towels to drain.
Drain the grease into a small container but leave a little in the pan to cook the scrambled eggs. Remove the scrambled eggs into a separate bowl. Add a little olive oil or bacon grease to the pan and saute all vegetables. Don’t overcook.
Add the rice and mix everything well. Add soy sauce, scrambled eggs, and shredded chicken. Mix well.

Prepared on 2011-06-08 (Tulsa, OK), Photographs by Michael Findley

Saturday, May 14, 2011

Aji De Pollo (Creamy Shredded Chicken with Turmeric)


My mom calls this dish “Picante de Pollo.” Everyone else I know — including my grandma — calls it “Aji de Pollo.” I guess it doesn’t really matter since “picante” means “hot” and “aji” means “hot pepper.”
This is a classic Peruvian dish and one you’ll find in many restaurants in Lima. For me, it’s the turmeric that makes the dish so special. The habanero gives it a slight kick, although in Peru you’d use aji amarillo instead.
Many people like to eat it as a dip for crackers and/or toasted French bread, but I prefer to serve it with rice.

Ingredients: (Serves 4 people)
6 cups cooked rice (1 1/2 cups per serving)
1 pound chicken breasts
3 hamburger or hot dog buns
1 1/2 cups milk (Any milk will do, I used skim)
1 large white onion diced
3 large cloves garlic smashed
1 chicken bouillon cube (if the broth is too weak)
1/4 habanero or 1/2 aji amarillo finely diced
1/2 tsp turmeric
2 tbs grated Parmesan cheese
olive or canola oil

Preparation:
Start by breaking the buns into small chunks. Soak the chunks in a bowl with the milk.
To make a broth, boil the chicken in about 3 cups of water for 15 minutes. Remove the chicken and set apart on a plate. Into a small container, pour the broth. Break the breasts apart with a fork or your fingers until you have small strips of shredded chicken, no more than an inch long.
In the same pot you cooked the chicken, saute onions along with garlic in a drizzle of oil; add the chicken bouillon, pepper, habanero or aji amarillo, and turmeric.
When the onions and garlic are sauteed and translucent, add about 1/4 cup of the broth. Add the shredded chicken and mix well. Cook 2 or 3 minutes.
Mash the bread and then add it to the pot; cook for about 5 minutes. If the cream gets too thick add more of the broth.
Add the Parmesan cheese and mix well. Turn off the heat and remove from the stove.

Presentation:
When serving with rice, I like to add a side of green beans or spinach fritters, but any kind of vegetable side will work.

Prepared on 2011-04-10 (Tulsa, OK), Photograph by Michael Findley

Wednesday, May 4, 2011

Torrejas de Espinaca (Spinach Fritters)


Torrejas are a very Peruvian dish.
You can throw in just about any vegetable you have in your fridge, as long as you include a larger proportion of spinach. In fact, spinach here is not really optional; it helps hold the torreja together while frying, and later while eating. In this particular recipe I used lettuce, parsley, onions and tomatoes because that’s what I had in the refrigerator at the time.
I love to just eat these with my hands; they’re so crunchy and full of flavor. They can also be used as sides to most of the dishes in this blog.

Ingredients:
1 cup spinach
1/2 cup onion
1/2 cup flour
2 eggs
1/2 cup water
1/2 medium habanero, seeded, deveined and diced
1 cup lettuce, only the greener parts of leaves
2 cloves garlic, smashed
1/2 cup finely diced tomatoes
1/3 cup parsley, chopped (no stems)

Preparation:
Steam the spinach for about 5 minutes.
Finely chop all the vegetables, including the steamed spinach, and place in a bowl.
In a separate bowl mix the water, flour and eggs; use a fork to blend well.
Add the flour-egg-water mixture to the chopped vegetables and mix well.
Use a large serving spoon to scoop a dollop of the mix onto a hot frying pan that was sprayed with nonstick oil. Fry, pancake-style. When the bottom has golden-brown spots, turn and fry on the other side.

Prepared on 2011-04-06 (Tulsa, OK), Pictures by Michael Findley

Monday, April 18, 2011

Chifles (plantain chips)


Chifles are snacks I grew up eating. Whenever someone in my family would visit my grandmother in Peru, they’d always come back with 2 or 3 bags of chifles in their suitcases. Chifles are slices of plantain which are set on paper towels to dry, and then fried. As soon as they come out of the pot they’re lightly dusted with salt and laid on paper towels again to drain.
A plantain has a similar shape to a banana, but its skin only turns yellow for a short period, just before ripening. A fully ripe plantain has a black skin. It’s starchier and firmer than a banana, and not as sweet.
We usually eat chifles by themselves like you’d eat potato chips, but it’s also customary to serve them with certain Peruvian dishes like ceviche and soups. In Peru, plantains are available year-round, so you can always find them in my grandma's kitchen.
I’ve never made these myself here in the U.S. — not because I can't find the ingredients, but because (thanks to whoever goes to visit my grandma in Peru) we always have some laying around our house.

Ingredients:
3 or 4 plantains
vegetable oil
salt

Preparation:
Cut the plantains into 1/16- to 1/8-inch-thick slices. If you want to speed up this process, you can use a mandolin. Lay a single layer of slices on paper towels to dry for about 30 minutes.
Add 1/2 inch of oil to a pot (deep enough to prevent splatter) and heat to medium high. Toss in a handful of the plantain slices and turn them until they become a gold color. Remove the fried plantain chips into a bowl, sprinkle a pinch of salt and toss to evenly spread. Empty the chips onto paper towels to drain. Repeat this process until all the plantain slices have been fried, salted and drained. The plantain chips will absorb some of the oil, so add more as needed.

Storage:
Store the plantains in air-free containers or plastic bags.

Photograph by Michael Findley

Friday, April 8, 2011

Tallarines Verdes (Spinach Pesto)


At my grandparents’ house in Lima, Peru, I had a green pesto-like dish called Tallarines Verdes. It’s essentially a green pasta dish with a green cream that tastes like pesto — but not exactly. Now, pesto is something I love to eat but it’s expensive to make and the ingredients are difficult to find. For example, fresh basil leaves are rare in American grocery stores. Then there are pine nuts, which are not really all that expensive, but are so rarely used that they sit in your pantry forever before you use them again (if you remember you have them in the first place).
My grandma told me she was making this dish, which I remember from my childhood in Peru, but for some reason I never made the connection to basil pesto until I saw it had a few (less than a quarter of a cup) basil leaves. I used to make pesto every week during the summer a few years ago when I grew basil in my back yard.
This is not a dish that is commonly served on its own. My grandma served it alongside breaded beef steak, with cut green beans and a potato.
I present to you 'Tallarines Verdes' — which loosely translated to English means 'Green Pasta' — although we can call it Spinach Pesto.

Ingredients:
1 pound of sirloin or loin steak
1 cup of bread crumbs
1 pound fettuccine, or any string pasta
2 cups cooked spinach (about 5 cups fresh spinach, before its cooked) and 1 cup of the water it was cooked in
1/2 cup queso fresco (a white cheese commonly found in large American grocery stores)
2 large cloves of garlic
1/4 cup vegetable oil
2 large potatoes with the skin left on
1 or 2 hard-boiled eggs
1 cup raw green beans cut into 1/2- to 3/4-inch pieces.
salt, pepper

Preparation:
First, prepare the spinach pesto, since it’s the easiest to make. Basically, the only cooked ingredient is spinach; everything else is fresh.


You can add all the ingredients into a blender at once, although I usually start with the dry ingredients like basil, garlic and cheese, and pulse these a few times with the vegetable oil and about half the cup of spinach water. Add the spinach, a little at a time to keep it from clogging the blender, and add the rest of the water as needed (shoot for a more liquid consistency than the basil pesto you’re probably used to). Once this is done, set the blender aside while you prepare the rest of the meal.
With whatever method you use to steam vegetables, put the potatoes in first, since they take about 40 minutes to steam, and add the green beans about 30 minutes later.
While heating a thin layer of oil in a frying pan, pound the beef steaks to 1/4-inch thickness. Rub salt and pepper into the meat with your fingers and dip the meat into the breadcrumbs. Brown both sides of the meat. Since it’s thin, it shouldn’t take long (about 3 minutes on each side).
Cook the pasta with your own method, about 8 minutes does it for me. Drain and put it back in the pot. Add 3/4 of the pesto from the blender to the pot and mix it well.

Presentation:
Start by placing the green pasta on the plate, then layer some green beans on top. You can serve the potato slices on the side, leaning them up against the pasta, then pour some of the pesto on top of the potatoes and green beans. Add the meat. Garnish the whole plate with Parmesan cheese and a hard-boiled egg wedge.

More pictures in order of preparation:


Recipe prepared on 2011-02-11 (Lima, Peru). Photograph by Michael Findley.

Wednesday, March 30, 2011

Batán (stone grinder)


The batán is a large stone for grinding and milling commonly used in southern South America. My grandma has been using the one pictured above for the last 60 years, and in her house in Peru it’s a must-have for many of the dishes she prepares.
Wikipedia has an incomplete entry for it here and a much better one in Spanish here. Basically it’s just two rocks — one large flat rock at the base and a smaller, rounder (or oval) rock which is used to crush or grind the ingredient between the two. It’s like a large version of a mortar and pestle.
One would think that a food processor could easily replace it, but according to my grandma, the taste and texture of the result is completely different.
The batán is used to grind all kinds of ingredients. It’s used to crush corn and cilantro for green tamales, and huacatay combined with aji amarillo for aji de huacatay. If you gave my grandma the choice of using an electric coffee grinder, or the batán, she’d grind her beans with the batán every time.


Since I don't have one of these in my Tulsa kitchen yet, I’ll try to improvise and update this post to let you all know what worked for me and what didn’t.


Photographs by Michael Findley

Saturday, March 26, 2011

Lomo Saltado (Saltadito)


Lomo saltado has to be one of my all-time favorites. Maybe it’s the way the meat is marinated, or the seasoning (or even the fact that the dish includes fries) but one serving is never enough. The dish itself is not all that complicated. The type of beef you use depends on how much you want to spend, as long as the beef can be cut into 1½-inch thin strips. The only thing that takes time is chopping and cutting the ingredients and frying the potatoes (and the dish actually works well even without fries).

Everyone in my family has his or her own way of preparing lomo saltado (also commonly known as saltadito — at least in my family). For example, my aunt who lives in Peru leaves off the potato and adds several other vegetables. My mom here in Tulsa adds the fries only part of the time, and she also spices the dish in a different way.

The key to a successful saltadito is to quickly sear the meat, to trap all the juices inside. Don’t overcook the meat. It’s small enough that it won’t take long. Remove the meat and use that same pan to saute the vegetables. (It adds to the flavor.)

Ingredients: (You can click on the red ingredient links to see more information, including where to find them)
2 cloves garlic
1 aji amarillo or jalapeno (optional)
1 pound sirloin steak
4 or 5 medium potatoes
2 large red onions
2 medium tomatoes
salt, pepper
1 tsp aji panca
3/4 tsp cumin
1/4 cup white or red wine vinegar
2 tsp soy sauce
2 cups of white rice
vegetable oil

Preparation:
Cut all the vegetable ingredients and separate them into individual bowls. Cut the tomatoes into wedges, the onions into thick slices and dice the aji amarillo, then peel the potatoes and cut them into french-fry-size pieces. Combine the onions, tomatoes and garlic into a large bowl and marinate them with the vinegar, oil, 1 tsp soy sauce, salt, pepper and about 1/4 tsp cumin. Cut the steak into 1 1/2 inch strips, about 1/4 inch thick. Rub a little salt, pepper, 1/2 tsp cumin and aji panca on the meat, and sprinkle about half the red wine vinegar and 1 tsp of soy sauce. Set this aside for a few minutes. If you’re serving fries with this dish, I recommend preparing them first (along with the rice) since it’s best to serve the meat soon after its cooked.
For the fries, pour about 1/4 to 1/2 inch of vegetable oil in a pan (its not necessary to completely cover the fries in oil) and turn it to medium high. After a few minutes, take one of your potato strips and dip the tip into the oil; if it sizzles, then it’s hot enough. Put the potatoes in, one layer at a time, and use tongs or a fork to turn them until they’re crisp on all sides and fully cooked through. Dry them on paper towels and set aside while you prepare the rest of the dish.
Coat a large pan with about a tablespoon of vegetable oil and set on high heat. When the oil starts smoking, drop the meat in. Stir constantly until the meat is brown on all sides. When you can’t see any more red on the meat, transfer it to a bowl.
Into the pan you just emptied, place the marinated onions, tomatoes and garlic; saute about 3 or 4 minutes. Drop the meat back into the pan and lower the heat to low. At this point, the meat and veggies don’t need to cook longer, just kept warm until serving time.
Mix the fries with the meat and veggies, or just place them on top. I like it both ways.

Presentation:
Put a healthy mound of rice on a plate and then ladle the saltadito on top or to the side of the rice. I prefer to put it on top so the rice can absorb some of the veggie and meat juices. If you mixed the fries with the saltadito while in the pan, you’re done. If not, add a few on top. Enjoy!

Some pictorial sequence pictures

Recipe cooked on 2011-02-13 (Lima, Peru). Photographs by Michael Findley.

Aji Amarillo (Yellow Chili Pepper)


This has to be one of the most essential ingredients in Peruvian cooking.
It’s used in popular dishes like papa a la huancayina, ocopa, tamales verdes, oyuco, aji de huacatay, causa rellena and ceviche.
It’s not really a very hot pepper, but it’s packed full of flavor.
This pepper can be stored dry and reconstituted before use (although this method will limit the number of dishes in which it can be used). According to food.com, aji amarillo is a chili pepper like aji panca.
Amarillo is “yellow” in English, although it turns a bright orange when it’s ripened.
I’m adding this post because several of the dishes I’ll share on this blog use aji amarillo.
I have yet to find aji amarillo at any of my local grocery stores here in Tulsa, but both Amazon and ebay sell them. I recently purchased an aji amarillo plant through Amazon. I’m really excited about growing this in my own backyard, and I’ll let you know in a few months if it’s still alive.


Update (2011-09-05):

                                  
Baby Aji Amarillo Pepper
I planted my aji amarillo peppers back on the 26th of April. I was very discouraged when no peppers appeared on my plants, although they appeared healthy in every way. I theorize that the heat we experienced this summer, with average daily temperatures above 100 degrees, prevented the flowers from setting fruit. I did notice during the past few months that the flowers would turn brown within a few days of appearing. I had almost given up on harvesting this year when suddenly, yesterday, I noticed about 15 or 20 small peppers. This has been the first week since June that average daily temperatures are below 100 degrees. In fact, our average daily temperatures for the last week have been around 85 degrees.
I now believe that temperature, more than soil conditions, has affected my plants. I’m happy to finally see small peppers, but I’m afraid it may be too late in the season for them to fully mature. I’ll post more updates in the following weeks.


Update (2011-11-12):
Last week during a freeze warning I harvested most of my Aji Amarillos. I left a few on the plant and covered them with plastic. It was all for nothing since we did not get a freeze. But now I’m left with a bunch of green, yellow, and orange peppers in various ripeness stages.

  
I left enough peppers on the plant, as seen below, and I’m hoping they’ll have enough time to ripen on the plant itself before the next freeze.


For the last week, I’ve used the green peppers in various dishes and was pleasantly surprised to find that they were, indeed, HOT and full of flavor. So tomorrow I’m going to try several ways to preserve them. I plan to take all the green peppers, seed them and then blanch them before putting them in a food processor along with salt and olive oil, and turning it into a puree of sorts that I can then freeze. The orange and yellow peppers I’ll cut in half, seed and blanch, and freeze just like they are. I’ll post an update with my results.


Update (2011-11-14):
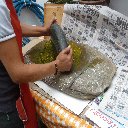
Like I mentioned in my last update (2011-11-12), I finally got around to preserving my peppers. I harvested any peppers that were still left on the plants that were over an inch in length. In the end, I decided to just process all the peppers in the food processor.  This actually worked out pretty well, and I got a good blend of flavors from the peppers at various stages of ripeness.  I took all the seeds from the orange (fully ripened) peppers and set them aside to dry for next year’s crop. I did however leave a bunch of peppers with the seeds in them, I’ll find out later whether this decision will prove to be a mistake or not.


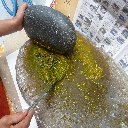
After cutting and seeding all the peppers, I quickly blanched them in hot water and set them aside in a colander to cool a bit before adding them to the food processor.


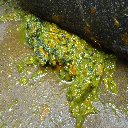
I added salt and oil to the food processor, and when I got the consistency I wanted, I placed the sauce in 5 jars and 2 small ice cube trays, similar to the way I did with the pesto.


These ice cube trays are small, about 1/2 inch square, the perfect size for adding to a bowl of soup, or a pot of stew.  All in all, I think I processed somewhere between 150 to 200 peppers (keep in mind all these came from only two plants).


I ended up with 2 small ice cube trays and 5 jars of the sauce, which hopefully will last a few months until next year’s growing season. I’m already planning for 6 plants next year.
This is turning out to be an unusually warm fall season. During most years, by this date we have already had many days of sub-freezing temperatures. Heck, even the leaves on most of my trees are still green. I know this wonderful weather can’t last much longer, so since I still have quite a few peppers on the plants, I may process the rest next weekend.


Photographs by Michael Findley